How Cosplay Designers Can Turn Character References Into 3D Printable Costume Parts
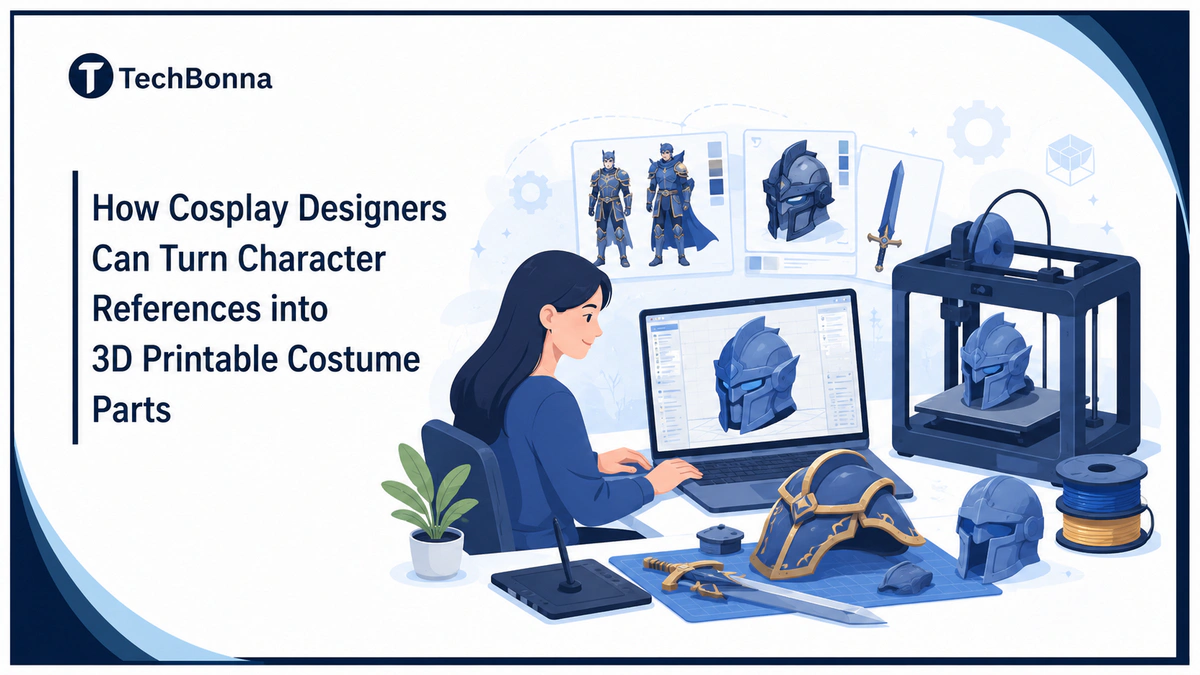
Table of Contents
Introduction
Cosplay 3D printing gives designers a faster way to turn character references into wearable props, masks, helmets, accessories, and armor. With AI 3D modeling and STL files, a flat image can become a practical build plan instead of a long stretch of guesswork.
The craft still matters. Sewing, foam work, glue, sanding, painting, and fitting decide whether a piece looks convention-ready, but better digital preparation helps the maker spend more time on finish and less time rebuilding from scratch.
Quick Answer
Cosplay designers can turn character references into 3D printable costume parts by collecting clear images, generating or modeling a first shape, checking scale and printability, exporting STL files, and testing the part before final assembly.
A simple workflow is:
- Collect front, side, back, and close-up reference images.
- Pick one component, such as a helmet, mask, prop, or shoulder plate.
- Create a draft 3D model from the strongest reference.
- Check fit, wall thickness, seams, and surface detail.
- Export the design, slice it, print a test, sand it, paint it, and assemble it.
Start With Clean Cosplay Character References
Most cosplays begin with a screenshot, concept sheet, anime frame, video game render, comic panel, or movie still. These references show the shape language of the character, but they rarely show every angle a maker needs.
The better the reference set, the less repair work you need later. Look for straight-on views, side views, material clues, trim details, and images that show how the item sits on the body.
This is especially important for cosplay props and fitted parts. A fantasy blade, sci-fi badge, or Star Wars-inspired helmet may look simple in one image, then become awkward when you need to wear, carry, or pack it safely.
Use AI 3D Modeling to Build the First 3D Model
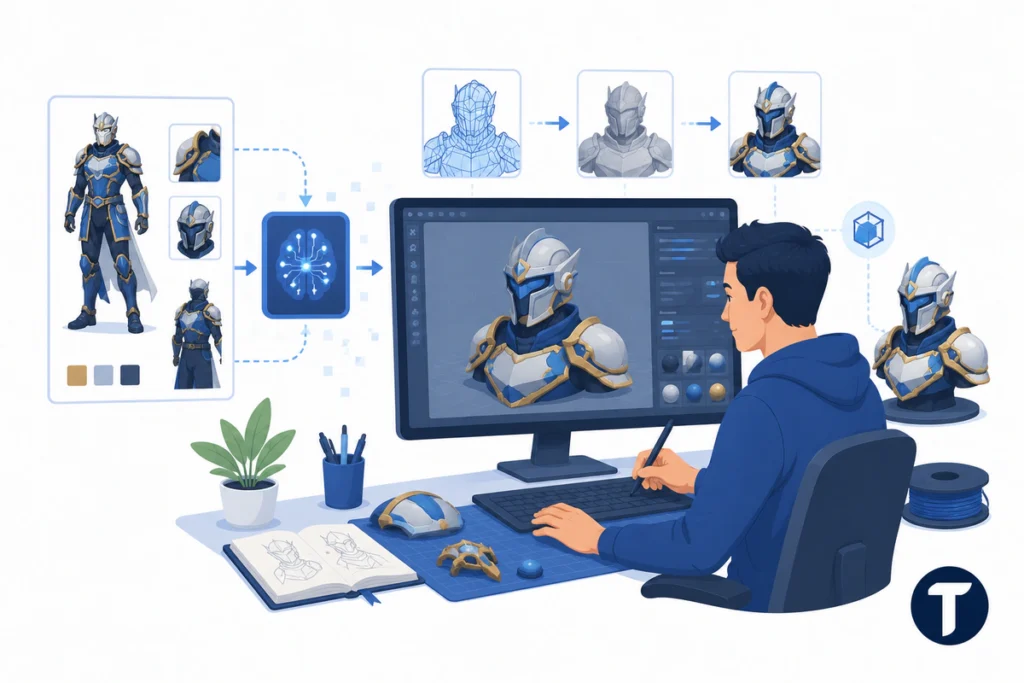
Traditional modeling software gives the most control, but blocking out the first version can take a long time. AI 3D modeling helps by creating a draft 3D object from a reference, so the designer has a shape to inspect and improve.
An AI 3D generation tool can help turn character art into a digital asset that is easier to rotate, scale, and refine. This can be useful for curved plates, raised trims, engraved surfaces, and unusual sci-fi forms.
If the reference only shows part of the item, an image to 3D workflow can still give you a workable silhouette before you start printing. Treat that result as a draft, then adjust proportions, edges, and details before fabrication.
AI should speed up the first pass, not make the final craft decision. The designer still decides what is accurate, wearable, and safe.
If you also need short videos to show the finished build or promote a convention reveal, TechBonna’s guide to image to video AI explains how creators can turn still assets into motion without a full production setup.
Check Scale, Fit, and Wearability Before Printing
A file can look good on screen and still fail on the build plate. Before you start printing, review the component as a wearable object, not just as something that looks accurate in the reference.
- Scale: Measure the part against the wearer, not only the reference art.
- Wall Thickness: Thin edges can crack during travel or post-processing.
- Split Lines: Large parts may need to print in sections.
- Assembly: Plan where straps, magnets, glue, or elastic will sit.
- Finish: Decide which details should be printed and which should be painted.
The safest time to fix the file is before filament or resin touches the printer. The NIST additive manufacturing research explains additive manufacturing as a digital design process where three-dimensional products are built layer by layer. That is why small modeling errors can become real-world fit, strength, or surface problems once the part is printed.
For helmets, masks, and armor, also check visibility, breathing space, sharp inner edges, and movement. A costume part should look accurate, but it also needs to be safe enough to wear at a crowded event.
Prepare Print-Ready STL Files for Cosplay Props
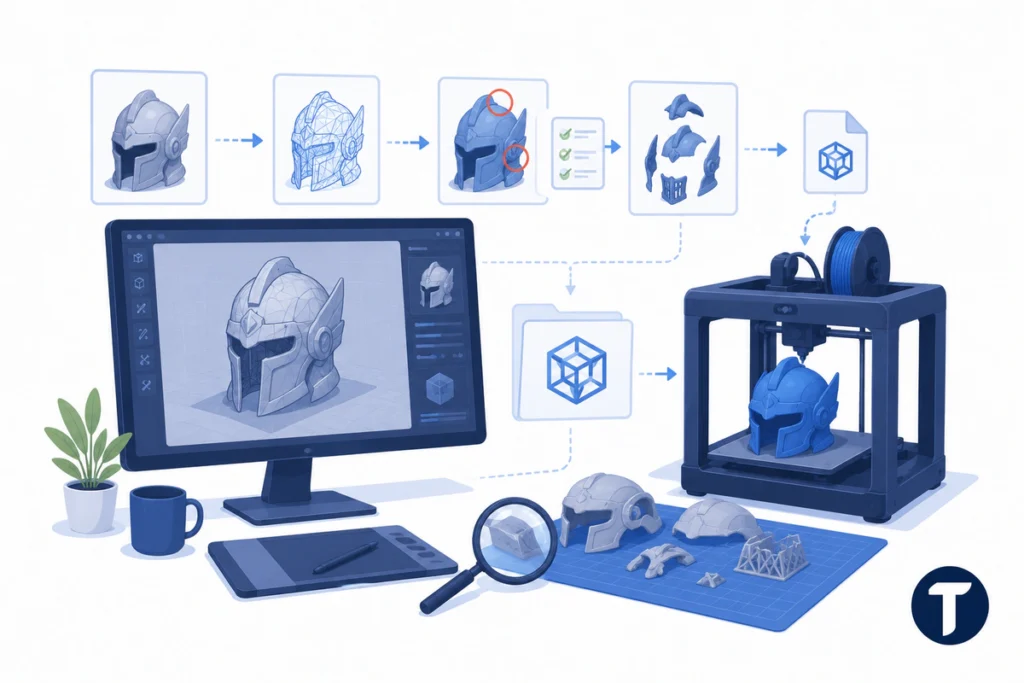
Many cool 3D printing projects fail because the digital model is not ready for fabrication. A clean handoff means closing holes, simplifying messy surfaces, checking supports, and separating large pieces so they fit the print bed.
A clean image to STL process can reduce friction by turning a reference-led design into a file format that is easier to slice, test, and adjust. Still, review the slicer preview before you commit to a long print.
An STL file is the bridge between design and fabrication. It is not the final result. Test a small section when fit matters, then revise the model before the full print.
Choose the Best 3D Printers and Materials for Cosplay
The best 3D printers for cosplay depend on the part, budget, and finish you want. A large FDM machine may suit armor, shields, cosplay helmets, and handled prop work. A resin machine may suit jewelry, badges, small masks, or detailed decorations.
Common 3D printing materials include PLA for easy beginner prints, PETG for tougher handled parts, and resin for sharp detail. FDM is often more practical for large pieces because filament is affordable and the build volume is usually better. Resin can create cleaner detail, but it needs extra cleanup, curing, ventilation, and safety care.
Many hobby makers compare Bambu Lab, Elegoo, Creality, and Prusa machines, but the best printer is the one that fits the size, detail level, material, and deadline of the part you want to make.
If you are new to the hobby, use a 3D printer you can maintain, not only the one with the biggest spec sheet. A DIY builder may want speed and bed size, while an enthusiast who wants tiny details may care more about surface quality. Multi-color systems such as AMS can help decorative pieces, but they are not required for a strong 3D print.
Choose the best 3D setup around the build, not the trend. Price matters, but reliability, repair support, bed size, and material handling matter more during a deadline.
Use Existing Resources Without Copying the Costume
Sites such as Thingiverse can be useful when you want to download a simple test part, study how other makers split a prop, or understand how printable geometry is organized. That does not mean every file is right for your character or body.
Use public files as a tutorial, not as a shortcut around design judgment. A strong cosplay 3D workflow still checks fit, accuracy, movement, and finish before the final build.
Reference files can teach structure, but your costume still needs its own decisions.
Test Small Before Starting Full Cosplay 3D Printing
If you want to get started, choose one small item before a full suit. A wrist guard, badge, buckle, mask detail, or simple prop teaches scale, supports, sanding, and paint without risking weeks of work.
A Mandalorian-style helmet, anime charm, or sci-fi gauntlet can all become 3D printed cosplay projects, but each needs different print settings, materials, support strategies, and finishing steps. One cosplayer may need scaling for comfort, while another hobbyist may need stronger joints for travel.
Small tests help you catch imperfections early. A narrow helmet opening, weak peg, rough seam, or bad support mark is easier to fix on a sample piece than on a full-size print.
The best way to elevate a build is to convert the reference into a testable part early. That gives you time to adjust the shape before wasting material on the wrong version.
Keep Craftsmanship in the Workflow
Cosplay and 3D printing work best when digital tools support hand skills. Sand the surface, fill seams, test flexible straps, paint in layers, and assemble the part so it feels natural on the wearer.
Before the final print, ask four questions:
- Does the component match the character reference?
- Can the wearer move, see, breathe, and carry it safely?
- Can the part be repaired if it breaks?
- Will the finish hide layer lines and seams?
Sanding, priming, painting, and sealing also need care. Work in a ventilated space, wear proper protection when needed, and avoid leaving sharp or brittle edges on parts that touch the body.
Digital speed only helps when the finished piece still feels intentional. That is how the world of cosplay brings fictional characters to life without losing the maker’s eye.
Final Thoughts
Turning character references into printable parts is now much easier for creators who want to bring their ideas to life. Start with clear images, use AI 3D modeling for the first shape, prepare STL files carefully, and run a 3D print test before the full build.
Cosplay 3D printing works best when AI 3D modeling supports real craft, not when it replaces it. The strongest workflow is not simply image in, costume out. It is reference, draft, inspect, scale, test, revise, print, and finish.
If you keep references clean, check fit early, and prepare STL files with care, your next cosplay can move from screen to convention floor with fewer surprises.